
This project is excellent for those wanting to experiment with Chocolate and coatings. There’s no need to be perfect since fireworks are small explosions. Although I listed it as optional, I strongly recommend using a heating pad to keep your chocolate liquid. This is a great way to avoid many of the problems that come with working with Chocolate.
You can also use them to decorate a sheet cake or ice cream sundae or make a milkshake over the top. As always, you can mix the colors up however you want!
Chocolate Fireworks Cake Tutorial by Erin Gardner
Supplies:
Coating Chocolate In red, white, and pale blue (or tinted with white Chocolate).
Heating pad
Paper towel
Aluminum Foil
Baking tray
Parchment paper
Toothpicks
Paper cones or small piping bags
Star-shaped edible gold confetti
Lollipop sticks
6-inch round layer cake
Extra buttercream colored with Gel food colors in navy blue and red
Bench Scraper Large icing spatula
Gold Star Sprinkles Or Candy
HOW TO MAKE FIREWORKS
Prepare your workspace first. Melted Chocolate is not patient. Set aside a few 3×3-inch parchment squares. For each firework you wish to create, you will need one square. Connect the heating pad to the wall and turn it up high. Cover the heating pad with a paper towel, and then cover the towel with aluminum foil. You can use this to make a bed for your chocolate piping bags.
Melt the coating chocolates (red, white, navy, and light blue) in separate heatproof dishes in a microwave, double boiler, or melting pot. Pour the different colors into small paper cones or piping bags. While working, store the cones inside the sleeping bag with the heating pad.
Place a square of parchment on a small tray. Pour a small puddle of dark blue Chocolate in the middle of the parchment. You can make the reservoir any size you want. My fireworks are available in sizes ranging from 1 1/5 inches to 3 inches in diameter. Spread and smooth out the surface of Chocolate by tapping the tray on your work surface.
In the middle of the puddle, pipe a circle of tiny dots of one of the other colors. Use a toothpick quickly to drag the bubbles toward the outer edge of the process. Tap the tray on the counter to smooth out the Chocolate.
Add a second color to the outer ring and place dots between each streak. Repeat the dragging-and-smoothing process and add more beads and bars if necessary.
Use the tip of the toothpick to shape the starburst. Add a slightly larger dot in the middle of the firework. Give the tray a final tap to make it smooth.
Sprinkle edible star confetti around the outer edge of the circle. Place the completed firework in the refrigerator or set it aside until firm. You can make as many fireworks as you want by repeating this process. I used 6 for my final project but also made extras in case they broke. I recommend you do the same thing.
Flip the hardened firework and pipe a thin line of navy chocolate to one of the outer edges of the circle. Roll the Chocolate around the end of the lollipop to cover it. Let the Chocolate harden before adding the fireworks to the cake. Some fireworks will not have sticks attached. These can be used to decorate the sides of your cake.
You can make fireworks up to a week in advance. Store them in an airtight container, layered with parchment or waxed paper, in a cool, dry place and at room temperature. Storing chocolate pieces that have been finished in the refrigerator will cause the star confetti and the chocolate surface to be damaged.
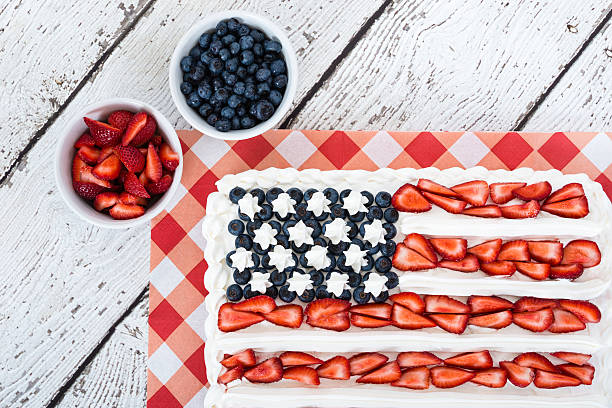
Frost the Cake
This ombre buttercream technique is very similar to. It’s just in patriotic colors. The buttercream should be smoothed and blended with a large icing scraper or icing spatula until the sides are #smoothenough. Add star confetti along the top edge of the cake, and let it fall down the sides.
Assemble the Cake
Add the fireworks sticks to the top layer of your cake when you are ready to serve it. Be sure to handle the posts by the post so they don’t break. Attach the fireworks with buttercream to the sides of your cake. On the top and sides of the cake, sprinkles or candies in larger sizes will be used to fill the space.


+ There are no comments
Add yours